Tuesday, November 1, 2016

Stampin' Up! Silver Denim Stars

I made this card for the November Splitcoast Creative Crew challenge "A Bundle of Holidays."  I bundled star textures with star framelits and used holiday colors.

The greetings in Sunshine Sayings stamp set can be used for so many different cards.  I used the congrats stamp for this card.  This card combines four of my favorite accessories: embossing folders, glimmer paper, ribbon, and DSP stacks.


Pin It

Sunday, October 30, 2016

Stampin' Up! Sugarplum Snowflakes Stepped Up

Here's a stepped up version of the card I posted yesterday.  Sometimes I like the clean and simple version, and sometimes cards do well being "stepped up" a bit.  In this case, I like both of the results.  I used the same colors: Sweet Sugarplum, Dapper Denim, and Pool Party.  I love the sugarplum glimmer ribbon in the Holiday Catalog, so I added a bit of that around the card.  This is another pretty quick card to make.
Pin It

Saturday, October 29, 2016

Stampin' Up! CAS Sugarplum Snowflakes

Luckily it's not time to see real snowflakes falling yet, but 'tis the season to start playing with some winter stamps.  Here's a clean and simple card that I made with the Flurry of Wishes stamp set.  My colors are Sweet Sugarplum, Dapper Denim, and Pool Party.

Pin It

Friday, September 30, 2016

Stampin' Up! Fall Polka Dot Paisley

I typically stamp a lot with the Brights color family, but when it comes to fall cards, I dust off my Regals and get to work.  This card uses the new Paisleys and Posies stamp set.  I used the matching framelits for the accents around the thanks.  Colors are: Always Artichoke, Cajun Craze, Elegant Eggplant, and Delightful Dijon.

Pin It

Monday, August 1, 2016

Stampin' Up! Sea Inspired Bunch of Blossoms

When I started this card, my intention was to use the colors from the challenge at Pals Paper Arts and make a floral card.  I have to admit, I don't pull out Marina Mist as often as I should, but I loved it with Pink Pirouette and Smoky Slate.  I pulled out my new Bunch of Blossoms set and chose a few stamps and went to work designing a card.  My daughter commented that she liked the sea shell stamps I was using and I realized that the stamps could indeed look like a flower/starfish and blossom/shell.  I love it when stamps can be used for more than just their intended purpose, the more uses, the better the value of the set! To really make the card more sea inspired to go along with the Global Design Project Nautical Theme Challenge #GDP047, I chose the Seaside embossing folder with a Marina Mist card base to look like water.  The pink layer is punched with the Banner Triple punch on both ends.


Pin It

Friday, July 29, 2016

Stampin' Up! Flirty Cucumber Bunch of Blossoms


Flirty Flamingo is one of this year's new In Colors and it is quickly becoming a favorite of mine.  I stamped the outline of the flowers using it and found that it pairs well with Pink Pirouette for 2-Step Stamping.  I used Cucumber Crush for the leaves and couldn't find another color to pair with it, so the inside of the leaves is also Cucumber Crush (I stamped it off once to give it the lighter color).  I love how the Bunch of Blossoms stamp set has the coordinating Blossom Builder Punch.  I stamped the leaves and stems on my 2-1/2" circle and then punched and added the flowers with a Stampin' Dimensional.  The polka dot paper is from the In Color DSP stack.  Banner strips are 1/2" Flirty Flamingo and 3/4" Cucumber Crush punched with the Banner Triple Punch.  Finally the background is textured with the Lovely Lace embossing folder to finish it off.

Today's card was inspired by the sketch challenge over at The Paper Players.

Pin It

Thursday, July 28, 2016

Stampin' Up! Peach Blossom Thanks

I'm so behind in my blogging!  I keep thinking that I'll get to it once I've taken better photos, finished a few more cards, after the kids are in bed, etc.  Excuses, excuses.  Well, it's Summer now and that means lazy days, right?  Seems more like CRAZY days (even though our mornings are occasionally a bit lazy as well).  I love the warm Summer evenings and spend them playing with the kids instead of worrying about when bedtime is.  Hope you are all having a wonderful Summer as well!

I have a whole box of new Stampin' Up! products to use and I'm just beginning to create with them so stay tuned.  Hopefully I can find the time to stamp AND post some of my creations.  I did photograph a few of my new cards so perhaps I'll get some posted more regularly.  

This card features one of my favorite new stamp sets that I purchased last month...FRESH FRUIT.  I've always been a fan of the 2-step stamping and I'm happy to see more of it in the new Stampin' Up! Catalog.  I feel like it takes me back to some of my Stampin' Up! roots.  I realized the other day that I've been a demonstrator for nearly 18 years!!!  Wow, time flies when you're having fun!  The FRESH FRUIT stamp set has a few basic sentiments in it along with some great flowers and fun fruit stamps.  I stamped the flowers in Daffodil Delight, Peekaboo Peach (a new In Color), and Watermelon Wonder.  I then mounted that on some Peekaboo Peach card stock and added a strip of striped designer series paper and mounted it all on my Watermelon Wonder card base.  Finally I added a little sentiment from Suite Sayings, punched it out with the Decorative Label Punch and attached it to the card with some Stampin' Dimensionals.  These colors just seem fun and summery to me.  What colors say Summer to you?


Pin It

Friday, March 11, 2016

Stampin' Up! Botanicals Just for You

Have you earned your free Sale-a-Bration sets yet?  I love the simplicity and boldness of the Botanicals for You set.  It works great as a single layer or embellished and layered for a fun card.  I paired the set with the Botanical Builders framelits and designer series paper for this card.  Colors are Mint Macaron, Crushed Curry, and Basic Black.

Pin It

Monday, March 7, 2016

Stampin' Up! Cucumber Dot Botanicals

I am so ready for Spring...and I think it shows in my stamping creations lately!  It's time for bright and fun cards.  I've been enjoying the warmer Spring-like weather we've had over the past week or two and loved the fact that ALL of our snow finally melted (I think we've had some snow on the ground since last November).  Then, last night we went out to visit family it was raining, then drove home in what I'd almost describe as a blizzard!  Thankfully it's sunny and melting today,

I haven't had a lot of time to stamp the past few months, but I LOVE the new stamps and accessories in the Occasions Catalog, so I was excited to try some of my new stamps out.  I decided to play along with the sketch at Freshly Made Sketches this week.  Thanks to the inspiration from this challenge I've been able to crank out a few new cards without too much effort.  I also decided to use a lot of green to go along with the challenge over at Stampin' Royalty.  After all, bright green says Spring to me, and Spring makes my heart happy.

I used some of my polka dot Cucumber Crush DSP from the In Color DSP stack for my background and layered that on black to help it "pop" off the white card base.  The word strip is Daffodil Delight and I stamped the awesome greeting from the Grateful Bunch set from the Occasions Catalog.  The bold flower is Melon Mambo, Daffodil Delight, and Cucumber Crush card stock cut out with the Botanical Builders framelits dies.  I decided that the leaves needed something to help them not get so lost against the green background, so I used the fern-like stamp from the Botanical Blooms stamp set to stamp some black detail on them.  Enjoy!

Pin It

Tuesday, March 1, 2016

Stampin' Up! Bold and Bright Botanicals

I'm in love with my stamp sets from the Occasions Catalog.  When I first flipped through the catalog, I thought it was nice and that I'd get a few new things, but as I've given it a closer look and have seen so many fabulous creations made with the new products, my wish list grew...and grew...and grew.  Since it's Sale-a-Bration right now, I figured it's a great time add some new sets to my collection/habit/hobby and I'm sure glad that I have done just that!  A few weeks ago I pulled out everything that is new from Sale-a-Bration and the Occasions Catalog and started creating.  What fun!

I'm always up for a new flower set since they can be so versatile, and I fell in love with the Botanical Blooms set at first sight.  This was my #1 pick from the Occasions Catalog and it does not disappoint!  I love the 2-step style and the photopolymer stamps sure make lining up the stamps easy.  I made this card with Melon Mambo, Daffodil Delight, Cucumber Crush, and Basic Black.  The card base is textured with the Decorative Dots Embossing Folder.  The totally awesome greeting is from the Grateful Bunch set (also in the Occasions Catalog) and is punched with the oval punch and the Decorative Label punch.


Pin It

Monday, July 20, 2015

Stampin' Up! Watermelon Pear Watercolor Wings

Today's card was inspired by the challenge over at Colour Me (a color challenge: Watermelon Wonder, Pear Pizazz, and Soft Sky) and the sketch challenge at Just Add Ink.

I used the Watercolor Wings stamp set and then cut out around the butterflies and mounted them with a Stampin' Dimensional.  I stamped the greeting on a 2-1/2" circle and layered that on a couple of colored banners (the edge was punched with the hexagon punch--I need to order that new banner punch).  The Soft Sky card stock is textured with the Fluttering embossing folder and everything is layered on a white card base.
Pin It

JAI #271

Saturday, July 18, 2015

Stampin' Up! Remarkable You Flower

Lately I've been able to play with the new In Colors a bit more and I'm finding a lot of color combinations that I like with them.  Today's card uses Mint Macaroon and Watermelon Wonder, and is inspired by the Photo Inspiration Challenge over at Stampin' Royalty.  Since there were so many fun things in the new Stampin' Up! Catalog and my budget was limited, I didn't get a chance to order the new In Color Markers yet.  I was kicking myself after ordering this set, but then I realized that I could pull out my (long forgotten) trusty blender pens.  I colored the flower image in by squeezing the ink pads so that some color was on the lid and then I picked up the color with the blender pen.  I think I should do this more often because it allows me to get varying shades of the color as opposed to the single color from the markers (see the flower petals with a bit of shading).

I mounted my stamped panel on Watermelon Wonder and Basic Black, then tied some white stitched ribbon around it.  I added a strip of Mint Macaroon card stock along the side of my white card base and then ran the whole thing through my Big Shot with the Fluttering embossing folder.
Pin It

Friday, July 17, 2015

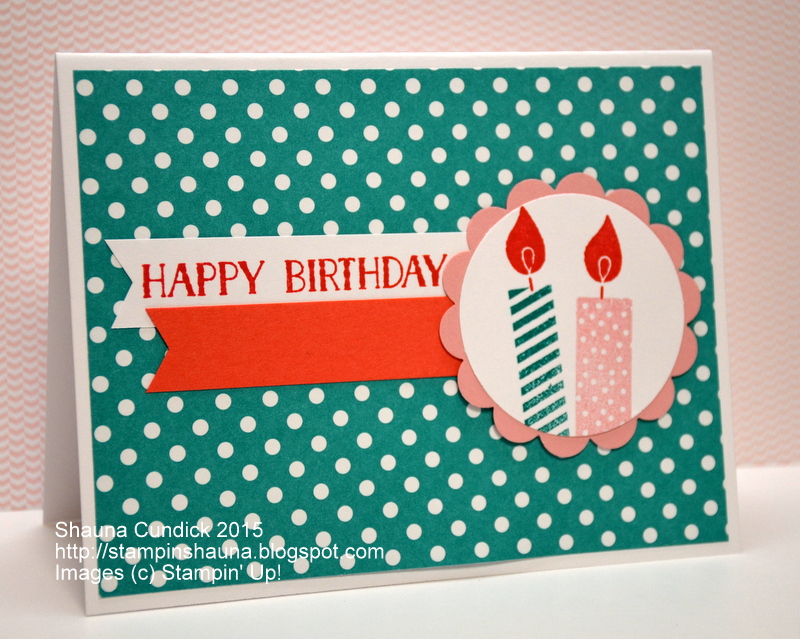
Stampin' Up! Bold Build a Birthday

I've been a long-time fan of Stampin' Up!'s Designer Series Paper Stacks, and this year's new designs do not disappoint!  The bold white polka-dots are so fun and versatile!  I used that pattern in Bermuda Bay for the background on this card.

I combined the color challenge  from Hand Stamped Sentiments
with the sketch challenge at Pals Paper Arts.

I used the Build a Birthday set to stamp the candles in Bermuda Bay, Blushing Bride, and Watermelon Wonder.  I stamped the "Happy Birthday" from the Tin of Card photopolymer set in Watermelon Wonder.  I punched out the candles with the 2" circle punch and layered it on the 2-3/8" scalloped circle punch.  For the greeting strip and the Watermelon Wonder strip, I cut them with the paper trimmer and then punched the end with the hexagon punch to create the banner shape (I really need to get one of those new triple banner punches!)  I wasn't sure about this color combination, but I love how bold and fun it is!
 Pin It

PPA260


Thursday, July 16, 2015

Stampin' Up! Sandy Mint Garden in Bloom


Once again it's been too long since I stamped!  I finally managed to make a few cards for some blog challenges (and for fun), and here's the first one.  I played along with the color challenge at The Paper Players and used Mint Macaroon, Sahara Sand, and Smoky Slate.

I stamped the flowers from the Garden in Bloom stamp set and the greeting from the Crazy About You set.  The background is textured with the decorative dots embossing folder.  To finish off the card, I tied some white stitched satin ribbon around the stamped panel.
 Pin It

Monday, July 6, 2015

Stampin' Up! Mother's Love Thanks

Most of the time I try to post ideas here on my blog that are made with current Stampin' Up! stamps, but occasionally I'll share cards made with stamps that have recently retired.  I made this card with the Mother's Love set that was in the 2015 Occasions Catalog.  I love this set and thought it was perfect for the flower themed challenge at Stampin' Royalty this week.

I stamped the stems for the flowers in Mossy Meadow and then stamped the flower part in Blackberry Bliss.  I textured the background with the Spring Flowers embossing folder and added a strip of Mossy Meadow DSP along the edge.  I tied some Blackberry Bliss stitched satin ribbon around the inner edge of the card and added just a small a piece of Mossy Meadow ribbon to it before tying the knot.  My "thanks" comes from the Crazy About You stamp set and I punched it with the decorative label punch before tucking it behind my stamped panel.

 Pin It

Wednesday, June 24, 2015

Stampin' Up! Garden in Bloom Butterflies

Other projects have been demanding my free time lately (aka nap time), so to have a little stamping time I had to go downstairs once the kiddos were all in bed.....way past their bedtime and mine!  I do admit, I had a lot of fun creating with Stampin' Up!'s new Garden In Bloom set again. I would have stayed up a while longer to keep creating, but I realized that my cute little alarm clocks always come wake me up so there will be no catching up on lost sleep.  So, one card is all I made, and I'm okay with that. 

This card is for the Picture Inspiration Challenge over at Stampin' Royalty.  Immediately I was drawn to the fun colors, so I created this card with Calypso Coral, Daffodil Delight, and Pear Pizazz.  I stamped Coral butterflies on my Coral card base and white butterfly outlines on my Pear layer.  I added some Daffodil paper from the new Brights DSP stack and layered that onto some white card stock (the bottom edge is done with the tiny wave rotary blade for the Stampin' Trimmer).  For my main panel, I stamped the outlines in Basic Gray.  The "thank you" is from the Work of Art set.  Each new catalog I find some great new go-to sets, and this Garden In Bloom set is becoming a fast favorite!  I can't wait to use it more!

 Pin It

Wednesday, June 17, 2015

Stampin' Up! Coral Blue Watercolor Wings

This week I had a few minutes to try out more new stamps.  Today's card features the new Watercolor Wings photopolymer set along with the new Fluttering embossing folder.

This week's challenge at Stampin' Royalty is a color challenge (Lost Lagoon, Soft Sky, Crumb Cake, and Calypso Coral).  Sometimes I get stuck in a rut and stick with the same few colors, so it's fun to play along and try out some new color combos.  I used the four challenge colors along with some white card stock and ink and this is what I came up with.

I stamped the solid butterfly from the Watercolor Wings stamp set with my Whisper White craft ink to help the butterflies stand out a little on the Crumb Cake card stock.  For the blue butterflies, I stamped the inner layer with Soft Sky and the outline layer with Lost Lagoon.  For the coral butterfly, I stamped another inner layer as well as the outline layer in Calypso Coral.  For the greeting I stamped it in white first and then in Lost Lagoon (the white helps it stand out a bit).  I textured the Soft Sky card stock with the Fluttering embossing folder and added some Calypso Coral seam binding ribbon around it before mounting it onto the Crumb Cake card base.

 I know the Watercolor Wings set has a lot of potential and I can't wait to try it out some more.  Check back soon for more ideas :)


 Pin It

Wednesday, June 10, 2015

Stampin' Up! Garden in Bloom Box

Summer is here!  Last week my order of new stamps arrived but I didn't have much of a chance to play with it because of all the last week of school festivities.  Even though I didn't get to use my new stamps, I had a lot of fun reading to first graders, spending an afternoon in the sun helping with Field Day, and making last minute thank you gifts for teachers, staff, and administrators.  I can't believe that another school year has already come and gone!  Now we have 11 weeks of Summer until we're back in the school routine, I'm sure they'll fly by.

On Monday I was hoping to take advantage of some nap time stamping, but instead spent the time trying to help my older two establish some Summertime routines.  So, once everyone was in bed for the night (and unfortunately it was an hour or so later than their usual bedtime), I finally had the chance to use some new product.  I decided to start out by making a project for the challenge over at Stampin' Royalty.  This week's challenge is to make anything but a card, so I came up with a fun little box that features the new Garden in Bloom photopolymer stamp set.  I love this stamp set, it reminds me of so many fun 2-step stampin' sets that were around maybe 15 years ago (the type of sets that really made me fall in love with Stampin' Up!).  I almost felt like I was stamping with a long lost friend when I used them, and it felt good to be back together!

I started out by cutting a sheet of white and a sheet of Soft Sky card stock down to 6"x6".  For the bottom of the box, I scored the Soft Sky card stock 1-1/16" from each edge and then cut the corners and folded it into a box.  That way the width of the box was almost 4" square.  For the top of the box, I scored the white card stock at 1" from each side (that way it would be just a tiny bit bigger than the base and then it would fit over the base easily).  I wanted some of the color from the base to show, so after scoring, I trimmed 1/4" off each side.  In the past I've tried cutting the lid smaller to begin with, but I find it's easier to figure the math if I score first and then cut (and then I waste less paper from mistakes).  I stamped images from the Garden in Bloom all over the lid of my box before folding it.  I used Melon Mambo/Pink Pirouette, Crushed Curry/So Saffron, Pacific Point/Soft Sky, and Cucumber Crush/Cucumber Crush stamped off once. 

For the tag, I stamped the word "enjoy" from the Endless Birthday Wishes photopolymer stamp set in Melon Mambo and then stamped the small butterfly images from the Garden in Bloom set.  I punched that out with the oval punch, then layered it on some Pink Pirouette punched with the scalloped oval, and finally layered that onto some Soft Sky punched with the decorative label punch.  I punched a 1/8" hole into my tag so that I could tie some ribbon through it.  I used Melon Mambo cotton ribbon to tie my box closed, and instead of putting one end of the ribbon through my tag hole, I brought both sides up through it so that my bow would sit completely on top of the tag.  Have you used your stamps to make something besides a card lately?
 Pin It


Tuesday, June 9, 2015

Stampin' Up! Petite Petals Gift Packs

What was I up to last week?  It was the last week of school and I spent more time at the school than usual.  I was hoping to make a bunch of packs of cards (6 in each pack) to use as thank you gifts for teachers, staff, and school administrators.  The week flew by and Friday came and I still didn't have the packs made.  I looked thorough my stash of cards and realized that I didn't have enough cards so I thought that I'd have to just let it go this year.  Well, on Friday our whole family joined my daughter's school at the last day of school concert (an awesome concert in the park with a couple of real musicians).  After the concert, we came home and my little one took a nap.  I got this crazy idea that I could bust through a bunch of cards in the 2-3 hours until school was out.  So, I enlisted my preschooler's help and we went to work!

I decided on these "you made my day" cards that I had designed a few months ago, but I changed up the greeting and colors.  Instead of giving everyone an assorted pack, I chose to make each pack have just one main color.  Did you know that preschoolers are excellent punchers and they actually enjoy giving free labor?  My little guy punched out 72 flowers in no time and then he proceeded to peel of Stampin' Dimensionals so that I could adhere all of the colored flowers to my cards.  I honestly couldn't have finished these cards without him.

All of the cards have a white card base and then a Soft Sky background.  I stamped "you made my day" from the Best Day Ever Sale-a-Bration set.  I added some green stems from the Painted Petals stamp set and then punched that out with my 2-1/2" circle punch.  I added the flowers punched with the Petite Petals set and then added a little rhinestone jewel in each center.  On the Soft Sky background, I stamped the bokeh stamp from the Best Day Ever to fill it in a bit.  Then I tied some coordinating ribbon around the card stock before adhering it to my white card base.

I finished with a little time to spare, so I decided that my card packs needed some tags to go with them, so I made 3x3 cards using the Decorative Label Punch, the Painted Petals set, and the Petite Petals punch.  I'm glad I had a few spare hours so I could do a little something for those that do so much for the kids at the school.  Nothing like doing things at the last minute, but if it wasn't for the last minute, a lot of things wouldn't get done!

 Pin It

Wednesday, June 3, 2015

Stampin' Up! Father's Day Stars

I'm excited!  This month I have the privilege of being a Guest Designer for one of my favorite blog challenges Stampin' Royalty.  Today's challenge at Stampin' Royalty is to create a Masculine Project.  What perfect timing--just before Father's Day.  Go ahead and join us this week so you can get your Father's Day cards done before the last minute.  I admit, I struggle a bit with the masculine cards.  I guess I just love the bright and girly colors more and I love adding ribbon to my cards.  Well, I successfully created a card without flowers and frills (although I was very tempted to sneak in some ribbon, but I resisted).  My card even got my husband's seal of approval.

Speaking of my husband, he has been pretty supportive of my hobby (addiction?) for the past 13 years.  When my husband and I were dating, my sister strongly suggested that I not show him my craft room until after I had a ring, she thought I'd scare him off--and I thought I had a lot of craft stuff then.  When we were engaged, he took me out for my birthday and drove me 30 minutes in the opposite direction from our destination just so I could go get a new catalog to look at (my downline got hers that day and I couldn't wait to see it) and then put up with me scouring the catalog instead of paying a lot of attention to him the rest of the drive.  He's always thought that the Stampin' Up! colors have silly names and he likes to poke fun of them at times.  He never liked it when a color was called what it wasn't (Not Quite Navy, Almost Amethyst) because he said that they should call a color what it is instead of what it isn't.  When I told him I was making a masculine card for this blog challenge, he initially suggested that I use Gross Green and Beautiful Brown, but then changed his mind and thought of colors such as Gorgeous Green, Galactic Green, Burly Brown, or Righteous Red.  I laughed and quickly wrote his suggestions down because I knew they'd be great for a blog post :)  The funny thing is, sometimes he's actually pretty good at guessing the color names.  When we had been married for just two years, we were in Walt Disney World and he commented that one of the monorails looked like it was Luscious Lemon and Stampin' Up! used to have a color called Luscious Lime.


I decided to go along with his suggestions when picking the color scheme for this card, so I used Mossy Meadow and Crumb Cake.  Now don't those names just scream masculine, lol?  At least the actual colors do, they give me a National Park kind of feel.  I used the Pictogram Punches stamp set for the star and punched a few out with the star from the Itty Bitty Accents Punch Pack.  I absolutely love Stampin' Up!'s Textured Impressions Embossing Folders, so I used the Lucky Stars embossing folder on the white card stock.  I cut out the "happy" with the Hello You thinlits and stamped the "Father's Day" from the Crazy About You stamp set.  I'm so happy that the thinlits and stamp set both made it into the new Stampin' Up! Catalog.  I cut the banner by cutting a strip of card stock and then punched the end of it with the hexagon punch to give it the banner shape.  However, now they have a nifty new banner punch to make it even easier!  I just need to get my hands on one of those punches. 

Thanks for stopping by.  Come back and visit again!  And, Happy Father's Day in a few weeks to all of you fathers out there, especially to the father of my kids!

 Pin It