Showing posts with label sweet essentials. Show all posts

Monday, September 9, 2013

Bold Midnight Curry Flowers

There are so many fun card challenges that I want to participate in and I just don't have the time.  So, this morning I decided to combine a couple of my favorites and this is the card I came up with.

I got my layout inspiration from the sketch over at Freshly Made Sketches and combined that with some color inspiration from Pals Paper Arts.  I love the bold colors together--Crushed Curry, Midnight Muse, and Early Espresso.  I stamped some flowers from the Flower Shop stamp set randomly and then layered that panel onto Midnight Muse and Early Espresso card stock.  I wanted to add more of the Crushed Curry color, so I textured a strip of it with the Petals-a-Plenty embossing folder and added that to the card.  I didn't want to overdo the bold colors, so I used a big panel of white on top of my Midnight Muse card base, that way I could also stamp my greeting from Sweet Essentials (using Early Espresso ink) without having to add another layer for the text.  To "tie" the card all together, I added some of my favorite 3/8" stitched satin ribbon in Midnight Muse.  Happy Monday!

PPA170


Pin It

Sunday, September 8, 2013

Pacific Olive Papillon Potpourri

This morning I sat down with my daughter and we did a little stamping.  It's fun to have a stamping buddy and she loved making things with butterflies.  My husband asked how soon she can sign up to be a demonstrator, and I told him that she has to be 18, so we have quite a while to go :)  I love watching her create and can't wait to spend more stamping time with her.

I stamped this card to go along with the color challenge at Dynamic Duos this week.  The duo is Old Olive and Pacific Point.  I started with a white card base and added some Olive Patterns DSP for the background.  I stamped some Pacific Point butterflies and punched them out with the Elegant Butterfly punch before layering them on my 1-1/4" and 1-3/8" squares.  I popped them up a bit with some Stampin' Dimensionals.  I layered the squares onto some Pacific Point card stock and added some white 1/4" stitched grosgrain and layered that onto my card.  The "thinking of you" comes from the Sweet Essentials stamp set and is cut into a pennant shape with the help of my trusty Hexagon punch (punched on the sides).  I couldn't decide whether I should put the greeting above or below my butterflies, so my little helper decided for me.  I think she made a good choice!  It's nice to have someone to bounce ideas off of :)

Pin It

Saturday, August 24, 2013

Summer Bright Stars

A friend of mine asked me to do a class for her this fall, so I've been stamping up a few cards.  I'm not sure how experienced the stampers are going to be, so I'm trying to keep things simple, but fun.  Here's one of the cards that we'll be making at the class.

I decided to keep the supplies simple for this card, so I picked one of my old favorite layouts.  I stamped all four of the stars from the new Simply Stars stamp set in both Daffodil Delight and Bermuda Bay (love the bold combo these two make)!  I'm so glad that Bermuda Bay returned this year and is now part of our main color families!  I mounted that stamped strip onto some Bermuda Bay card stock and tied a bit of Daffodil striped grosgrain ribbon around it before mounting it onto my Daffodil Delight card base.  I stamped the "thinking of you" from the Sweet Essentials stamp set in Bermuda Bay to finish off the card.  Simple, yet striking!  You could even leave off the ribbon (or leave it on) and this card would work for a man too.

Pin It

Thursday, July 4, 2013

Patriotic Congrats

Happy 4th of July!  I decided that today was a great day to use my Simply Stars set with a patriotic theme.  I used the colors from the Pals Paper Arts challenge--Real Red, Pacific Point, and Crumb Cake.  I punched the stars out with the retired small and large star punches from Stampin' Up!  The background is textured with the stripes embossing folder (you can't have stars without stripes on Independence Day).  I stamped the congrats stamp from the Sweet Essentials set.  I hope you all enjoy the holiday!

6a00e54f95df9288340192abcd6fc3970d-320wi

Pin It

Friday, April 26, 2013

CAS Baby Label Card

I have a feeling that this new Label Love set is going to get a lot of use!  I love the fact that there is a matching punch (the Artisan Label punch) to go along with the set.  There are also other punches that fit the greetings on the stamps.  This particular stamp also coordinates with the new 7/8" scallop circle punch, which makes it super easy to have a two toned stamped image without a lot of work!

I wanted this card to have a clean and simple feel, so I used a white card base and kept my lines clean and straight.  I stamped my label image in the NEW Smoky Slate ink as well as in Marina Mist.  I kept the Smoky Slate image as my base and punched the greeting out of the Marina Mist image and layered it on the base with a Stampin' Dimensional.  I mounted the stamped image on some Marina Mist, Whisper White, and Smoky Slate card stock.  I cut a 1-1/2" wide strip of Marina Mist polka dot paper from the Polka Dot Parade DSP and layered that on some Smoky Slate card stock.  Finally, I stamped the "congratulations" from Sweet Essentials in Marina Mist to finish the card.  Keep checking back for more sneak peeks!

Pin It

Tuesday, March 12, 2013

Petite Black Mambo

At first when I saw the Pretty Petites stamp set, I thought the images were too small for the focal point on cards.  However, when paired with the regular curly label punch, I think they really stand out!  I've stamped my image in Melon Mambo, punched it with the petite curly label punch, and framed it with some black patterns DSP and the curly label punch. I didn't want the Melon Mambo frame to just be plain card stock, so I textured it with the Polka Dot embossing folder before layering it onto my black card stock.  I wanted this card to be clean and simple, so I used a plain white card stamped with a simple greeting (from Sweet Essentials) and then layered my strip and frame onto it to finish it off.  Hope you enjoy!

Pin It

Wednesday, January 30, 2013

Raspberry Textured Butterflies

After making yesterday's neutral butterfly card, I left out the Papillon Potpourri set.  So, today when I wanted to make a card for the Pals Paper Arts sketch challenge, I decided to use Papillon Potpourri again.  After all, you can't go wrong with butterflies!  I picked a simple color palette--Raspberry Ripple, Basic Black and White and then I started creating.

I textured some Raspberry Ripple card stock with the Petals-a-Plenty embossing folder and used that for half of my background and for my circles that the butterflies sit on.  I also used some striped Patterns DSP for the other half of my background.  I stamped the floral butterflies from the Papillon Potpourri stamp set and punched them out and layered them on Raspberry textured circles and on black scalloped circles.  I don't have the smaller butterfly punch yet, so I cut that by hand--that punch will be on my next order!  I stamped the "friends" stamp from the Sweet Essentials stamp set and then cut it with the larger banner from the Bitty Banners framelits.  I then layered everything on some white, black, and finally the Raspberry Ripple card base.
Pin It
PPA151 Sketch


Tuesday, January 29, 2013

Nature's Butterfly Duo

Wow, I actually made a card that doesn't use Sale-a-Bration or Spring Catalog items.  When I saw the Dynamic Duo combo, I knew I wanted to try it out with something from nature.  I've been stamping with flowers a lot lately, so I decided it was time to pull out my trusty Papillon Potpourri set and make a butterfly card again.  I have been neglecting my stamp sets from the "regular" catalog the past couple of months but I do love a lot of the sets in there.  This week's Dynamic Duo colors are Crumb Cake and Soft Suede.  I have to admit, I didn't always like Soft Suede, but this past year I have fallen in love with it.  It works so well with a lot of great colors.  I especially like the soft natural look it gives when paired with Crumb Cake like in this card.

I started this card by stamping a panel full of butterflies in both Crumb Cake and Soft Suede.  I glued that along with some Crumb Cake Striped Patterns DSP onto a layer of Soft Suede and White.  I mounted those layers on my Crumb Cake card base that is textured with the Petals-a-Plenty embossing folder.  I have found that I love combining Patterns DSP along with embossing folders--there's just something about the combination of patterns and texture that I love.  I stamped an extra butterfly and punched it with the coordinating Elegant Butterfly punch and layered it onto a 1-3/8" circle (also textured like the card base) and then onto a Soft Suede scalloped circle.  I made my word banner with the Sweet Essentials stamp set and hand-cut the pennant shape in both white and Soft Suede.  I think I have found yet another favorite color combo!


Pin It

Monday, January 28, 2013

Midnight Daffodil Garden Sketch

I love the sketch over at Freshly Made Sketches right now, it lends itself so well to my favorite designer series paper--the Patterns Stacks!  I wanted to keep up with my "brighter" cards to offset the cold and snow, so I chose a palette with Daffodil Delight.  That color can add some brightness and sunshine to anything!  I shouldn't complain too much about the weather though.  We had 3 weeks of cold, smog, and inversion and today I can actually see the sun!  As far as snowstorms go, I can tolerate them (a little) when the next day it is clean, white, and bright outside.  Here's hoping a lot of it will melt :)

I combined Daffodil Delight with Midnight Muse and Gumball Green (both 2012 In Colors) for this card.  I stamped a couple of the bolder flowers from the new Secret Garden stamp set and raised them to different heights with Stampin' Dimensionals.  I wanted some bold leaves so I used the leaf sizzlit die to cut some from the Gumball Green card stock.  Sweet Essentials is the set where I got the "thinking of you" stamp and I hand-cut the banner for it.  My background is made up of Midnight Muse Patterns DSP and Daffodil Delight card stock that I textured with the Chevron Textured Impressions Embossing Folder as well as a bit of white card stock for layering.  I haven't used this color combo before, I generally use Summer Starfruit with this blue and green, but I think I'll be coming back to this again and again--I really like the brightness that the Daffodil adds.  Here's to warm and sunny thoughts everywhere!


Pin It

Tuesday, January 15, 2013

Bright Heart Congrats

I'm finally back with another card.  Life just gets in the way of stamping and blogging sometimes.  Here's another card using the Hearts a Flutter set from the new Stampin' Up! 2013 Spring Catalog.  Can you tell that this is one of my favorite new stamp sets?  Sometimes I don't realize that I have a favorite until I've been stamping with new sets and then I realize I have way more samples with one set than I do with the others--like with this set!

I didn't make this card for a particular purpose, I just decided to sit down and create--no color suggestions, no layout, just create on my own.  I love these three colors together: Melon Mambo, Daffodil Delight, and Pacific Point.  They are so bright and fun, and they add some boldness to help make this a more all-occasion card instead of just a Valentine's Day card.  In fact, I decided to use the "congratulations" stamp from the Sweet Essentials set so that I can use this for a wedding card sometime.  I stamped hearts all over my main panel and then layered it on Pacific Point card stock.  I then tied some of the new Melon Mambo striped organdy ribbon around it (I wish this ribbon came in more than 3 colors--I love it that much).  I put a pinking edge along the bottom of the Daffodil Delight layer (with the Finishing Touches Edgelits die) to play on the chevron pattern of the yellow hearts.  I stamped Melon Mambo hearts all over the Melon Mambo card base to give it a subtle pattern before adding my stamped panel and my word banner.  I hand-cut the banner and then added a heart that I cut out with the Hearts a Flutter Framelits die and popped it up with a Stampin' Dimensional. 

Saturday, January 5, 2013

Spring Garden

The holidays are officially over, so now I don't feel too bad moving forward to Spring.  Christmas was wonderful, the New Year wasn't, so I'm ready get a fresh start and forge ahead to Spring.  I long for the crisp days with new life and growth.  I can't wait to hear the birds chirping and the flowers sprouting.  Since we're stuck in a nasty inversion and frigid temperatures, I'll give myself a little of the Spring feeling through my stamping.  What better way to do this than to combine the fun Springy colors from Hand Stamped Sentiments this week!  The challenge was to use Primrose Petals, Pool Party, and Basic Black.  I love challenges that combine new and old In Colors, it helps get me out of the thought that they belong with their own group and proves to be a winning combo.

I selected the Secret Garden set from the new Stampin' Up! 2013 Spring Catalog as  my focus for this card.  I stamped the panel with two of the bold flower stamps and then started layering with Primrose Petals and Basic Black.  That panel needed some ribbon, so I tied on some Primrose Petals stitched satin ribbon.  I had to use some of my favorite Patterns Designer Series Paper (cards almost don't seem complete to me without some DSP), so I used some striped Primrose Petals and some polka dot Pool Party paper.  I stamped the "thinking of you" from the Sweet Essentials set on the polka dot paper and then layered those onto some more Basic Black and finally onto my Pool Party card base. 


Pin It

Sunday, December 23, 2012

Petite Birthday

It's time for a sneak peek with another upcoming Sale-a-Bration set.  This card actually features two Sale-a-Bration 2013 items: the Pretty Petites set and the coordinating Petite Curly Label Punch.  I decided to stamp a birthday card with this set, and I also tried to make it more masculine (or gender neutral) so I chose the colors Real Red, Tangerine Tango, and Daffodil Delight.  I stamped the birthday image in each of these colors and then punched them and then mounted them onto (my favorite) Patterns Designer Series Paper.  I mounted my layers on white to help them stand out a little before mounting them on another color.  I chose some Real Red stitched grosgrain to tie around my main layer and then stamped the "make a wish" stamp from the Sweet Essentials stamp set in Basic Black.  I used the sketch at Mojo Monday to come up with the layout for this card.  Are you getting excited for Sale-a-Bration?  I can't decide what my favorite set is yet, I love all of them that I've used so far!


Pin It

Friday, December 21, 2012

Rich Garden Blooms

I love the rich colors from this Stampin' Royalty color challenge: Riding Hood Red, Summer Starfruit, Lucky Limeade, and Island Indigo.  I used some Patterns Designer Series Paper for my striped and polka dot paper--I just love how those subtle patterns add so much to the card!  My stamped panel was made with the new Secret Garden stamp set that will be available next month in the Spring 2013 Catalog.  I layered that on some Riding Hood Red card stock and then tied it with some Island Indigo ribbon that came from the Sale-a-Bration Sycamore Street ribbon and button pack.  The "so kind of you" stamp is from the Sweet Essentials stamp set and is stamped in Island Indigo as well.


Top Picks Badge Pin It

Tuesday, December 18, 2012

Raining Congrats

Here's a sneak peek of another new set--this time from the upcoming Spring 2013 catalog.  I love the umbrellas in the Rain or Shine stamp set.  I think they would not only be perfect for a Spring card, but also an "under the weather" or a wedding/baby shower type card.  I decided to use the Sweet Essentials set for my greeting here so that I could use this card for a bridal shower.  I used the colored polka dot paper from the Sunshine and Sprinkles DSP for my color inspiration and added stamped images in Regal Rose, Old Olive, Marina Mist, and Basic Gray.  My card base is Regal Rose card stock and I added some of my favorite Patterns DSP in Regal Rose so that there was a little pattern for my background.  Don't you just love the new striped organdy ribbon?  I do, so I used some of it in Old Olive to tie around my DSP panel.  I hope you are enjoying the sneek peeks--stay tuned for more!

Friday, December 7, 2012

Big Bright Flowers

Are you ready to see more new stamps?  This card was made with flowers from the new Secret Garden set (available January 2013).  I stamped them in Melon Mambo, Tangerine Tango, Daffodil Delight, and Gumball Green.  I used some daffodil patterns dsp along the bottom and stamped my greeting form Sweet Essentials in black.  I then layered it onto some Tangerine Tango card stock and tied some Gumball Green stitched satin ribbon around it before layering it on some white and finally Melon Mambo.  Easy, fun, and bright!  I'm ready for Spring now :)

Pin It

Monday, December 3, 2012

Cheery Snowflakes and Polka Dots

I'm in love with the fun color combo used in the current colourQ challenge.  I used to lean more to the traditional side when it came to colors for snowflakes and Christmas cards, but I've learned that it is way more fun (and often more visually appealing) to mix things up a bit.  I really like the pink and blue mixed with the traditional red and green.  I tried to stay pretty true to the suggested colors, but I did swap Wild Wasabi for Glorious Green and Tempting Turquoise for Cool Caribbean so that I was using current Stampin' Up! colors.  I sure miss having Cool Caribbean around, but I guess we can't have them all, can we.  I think the combo still works well and is pretty close! 

I stamped the snowflakes from the Snowflake Soiree set in Real Red, Regal Rose, Wild Wasabi, and Tempting Turquoise and then cut the panel into three pieces before mounting it onto my Regal Rose card stock.  I then mounted that onto some Tempting Turquoise Patterns DSP (love those polka dots with the snowflakes) and then onto white and finally onto the Wild Wasabi card base.  Originally I was planning to just use a turquoise card base, but after trying it both ways the wasabi won--it just looked better and cheered up the card with extra color!  I added some stitched grosgrain in Real Red around most of the layers and then tucked my greeting under the stamped panel.  I used the Sweet Essentials set (specifically the "make a wish" stamp) and just inked up the "wish" part of it.  Then I punched it the tall way with the Decorative Label Punch to give it some shape.

I have to say that I think Snowflake Soiree is one of my favorite, if not the favorite, of all my snowflake sets.  I didn't think I'd say that when I first got it, but the shapes and patterns are just too much fun!  That is saying a lot as I've been a Stampin' Up! Demonstrator for over 14 years now, and that means I have a LOT of snowflake sets--come on, you know that we always "need" the latest and greatest snowflake set :)  I'm typing up this blog post as I look out my window and see the sunny blue skies and not a bit of snow on the ground, which is just fine with me!  We got a little snow in the mountains last night, but just a bunch of rain here in the valley.  Now this is my kind of winter!  I'd prefer to have my snowflakes be the stamped kind and my snowmen to be the sidewalk chalk variety.


Pin It

Wednesday, November 14, 2012

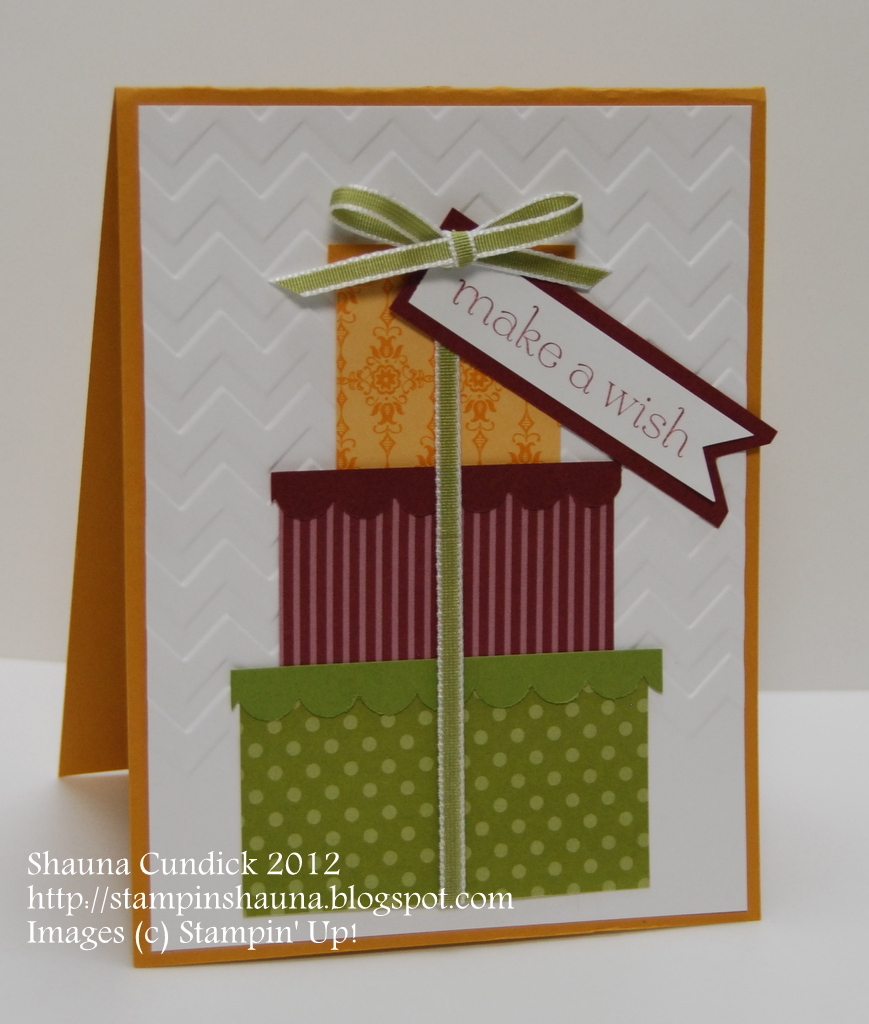
Gift Stack

It's so fun to be able to share ideas with each other online.   I saw an idea that inspired this card online, but it wasn't credited, so whoever made a card like this for a swap, thank you for the inspiration!  I took the idea she used of the stacked gifts and switched it up a bit.  I decided to make my card be a birthday card, so I chose some fun papers from the Patterns DSP stacks in the colors to go with The Paper Players challenge this week--Old Olive, More Mustard, and Bravo Burgundy.  I cut my designer series paper into rectangles and then made "lids" for each of the gifts by punching strips of the matching card stock with the scallop edge punch (I sized the strips just a tad longer than the gifts).  I wanted to keep my background clean and simple so that the gifts would really stand out, so I used white for a background color.  It needed some texture in the background to go along with all of the fun patterns, so I textured it with the Chevron embossing folder before mounting it on my More Mustard card base.  I used some Old Olive 1/8" Taffeta Ribbon to "tie" my gift stack together and then made a tag with card stock and the Sweet Essentials stamp set.  The bow is actually a separate piece of ribbon that I tied and then adhered with a mini glue dot on top of the tag.  This is a fun idea that could be used for Christmas as well. 


Pin It

Sunday, November 11, 2012

Saffron Blossom Trio

I am already excited to see Spring blossoms.  I know, I know, I should just enjoy the seasons, but this 12+inches of snow we've gotten is a bit much for me.  My kids, however, are loving the cold white stuff.  Maybe I just need to actually get a pair of boots so that I can stomp around in it with them.  My daughter says it isn't Winter yet (because she pays a lot of attention to what the calendar says), so it should still feel like Fall for another month, right?

Since I'm in this Winter denial, I opted to stamp with flowers once again.  I chose the Summer Silhouettes set for the flowers and Sweet Essentials for the greeting.  I used the color combo from Stampin' Royalty: So Saffron, Pumpkin Pie, Gumball Green, and Chocolate Chip.  I textured the background with the Petals-a-Plenty embossing folder (just along the top 2/3).  I wanted to add more patterns, so I used some of the Pumpkin Pie colored paper from the Polka Dot Parade DSP and then tied my stamped panel with some Gumball Green Stitched Satin Ribbon.  Now, can we just cross our fingers that this snow will melt and we can get back to Fall?  I still need to take pictures of my kids in their Halloween costumes, and I'd like to do it outside with the leaves.


Top Picks

Pin It

Tuesday, November 6, 2012

Three Paneled Flowers

Here's a challenge for you.  Take one of your cards, keep everything the same except for the actual stamps.  That means, keep the same colors, layout, accessories, etc.--just change the stamps.  It's actually a great way to use up leftovers.  I made this snowflake card and shared it at a demonstrator swap a couple weeks ago where the others each made the card.  I had one set of supplies leftover, so I grabbed the Mixed Bunch set instead of the Snowflake Soiree set and made this card.  I love how versatile stamping is!

Other supplies used: Polka Dot Parade DSP, Midnight Muse stitched satin ribbon, Marina Mist, and Midnight Muse ink and card stock, Baja Breeze card stock, decorative label punch, Sweet Essentials stamp set.

Pin It