I decided in honor of the today, I'd do a blog post. However, my only joke is that I'm posting a Winter card in the Spring. I designed this card last November and we made it at my Christmas Stamp-a-Stack, but I didn't get around to photographing it until a couple of weeks ago. I used the Endless Wishes photopolymer set to stamp snowflakes in Pool Party, Marina Mist, and Wisteria Wonder. The Endless Wishes set is currently on Stampin' Up!'s Clearance Rack if you haven't already snagged one for your collection. When it's gone, it's gone. I layered that stamped panel with Wisteria Wonder and Pool Party card stock and then tied some Marina Mist cotton ribbon around it. Finally, I textured the Marina Mist card base with the Filigree Frame embossing folder (which is also on the Clearance Rack right now). Hope you like this Winter card, hopefully we can all enjoy some gorgeous Spring days soon!
Showing posts with label christmas cards. Show all posts
Wednesday, April 1, 2015
Endless Wishes Snowflakes
Happy April Fool's Day! I was reading through the news and know that some headlines are a joke today, but I find myself questioning whether others are real or not (it's kind of annoying). We don't get too into the pranks around here (thank goodness), but we have had a couple of "there's a spider on your head" along with some giggles, but that's about it. The kids may call my in-laws to tell them "there's an elephant in your dryer" because my husband said he used that line growing up on April Fool's. Silly holiday. Mother Nature did play a prank, we've had gorgeous days in the high 70s earlier this week and today she's teasing us with 30 degrees cooler.
I decided in honor of the today, I'd do a blog post. However, my only joke is that I'm posting a Winter card in the Spring. I designed this card last November and we made it at my Christmas Stamp-a-Stack, but I didn't get around to photographing it until a couple of weeks ago. I used the Endless Wishes photopolymer set to stamp snowflakes in Pool Party, Marina Mist, and Wisteria Wonder. The Endless Wishes set is currently on Stampin' Up!'s Clearance Rack if you haven't already snagged one for your collection. When it's gone, it's gone. I layered that stamped panel with Wisteria Wonder and Pool Party card stock and then tied some Marina Mist cotton ribbon around it. Finally, I textured the Marina Mist card base with the Filigree Frame embossing folder (which is also on the Clearance Rack right now). Hope you like this Winter card, hopefully we can all enjoy some gorgeous Spring days soon!
Labels:
big shot,
christmas cards,
endless wishes,
stampin' up!,
winter
Monday, December 3, 2012
Cheery Snowflakes and Polka Dots
I'm in love with the fun color combo used in the current colourQ challenge. I used to lean more to the traditional side when it came to colors for snowflakes and Christmas cards, but I've learned that it is way more fun (and often more visually appealing) to mix things up a bit. I really like the pink and blue mixed with the traditional red and green. I tried to stay pretty true to the suggested colors, but I did swap Wild Wasabi for Glorious Green and Tempting Turquoise for Cool Caribbean so that I was using current Stampin' Up! colors. I sure miss having Cool Caribbean around, but I guess we can't have them all, can we. I think the combo still works well and is pretty close!
I stamped the snowflakes from the Snowflake Soiree set in Real Red, Regal Rose, Wild Wasabi, and Tempting Turquoise and then cut the panel into three pieces before mounting it onto my Regal Rose card stock. I then mounted that onto some Tempting Turquoise Patterns DSP (love those polka dots with the snowflakes) and then onto white and finally onto the Wild Wasabi card base. Originally I was planning to just use a turquoise card base, but after trying it both ways the wasabi won--it just looked better and cheered up the card with extra color! I added some stitched grosgrain in Real Red around most of the layers and then tucked my greeting under the stamped panel. I used the Sweet Essentials set (specifically the "make a wish" stamp) and just inked up the "wish" part of it. Then I punched it the tall way with the Decorative Label Punch to give it some shape.
I have to say that I think Snowflake Soiree is one of my favorite, if not the favorite, of all my snowflake sets. I didn't think I'd say that when I first got it, but the shapes and patterns are just too much fun! That is saying a lot as I've been a Stampin' Up! Demonstrator for over 14 years now, and that means I have a LOT of snowflake sets--come on, you know that we always "need" the latest and greatest snowflake set :) I'm typing up this blog post as I look out my window and see the sunny blue skies and not a bit of snow on the ground, which is just fine with me! We got a little snow in the mountains last night, but just a bunch of rain here in the valley. Now this is my kind of winter! I'd prefer to have my snowflakes be the stamped kind and my snowmen to be the sidewalk chalk variety.

I stamped the snowflakes from the Snowflake Soiree set in Real Red, Regal Rose, Wild Wasabi, and Tempting Turquoise and then cut the panel into three pieces before mounting it onto my Regal Rose card stock. I then mounted that onto some Tempting Turquoise Patterns DSP (love those polka dots with the snowflakes) and then onto white and finally onto the Wild Wasabi card base. Originally I was planning to just use a turquoise card base, but after trying it both ways the wasabi won--it just looked better and cheered up the card with extra color! I added some stitched grosgrain in Real Red around most of the layers and then tucked my greeting under the stamped panel. I used the Sweet Essentials set (specifically the "make a wish" stamp) and just inked up the "wish" part of it. Then I punched it the tall way with the Decorative Label Punch to give it some shape.
I have to say that I think Snowflake Soiree is one of my favorite, if not the favorite, of all my snowflake sets. I didn't think I'd say that when I first got it, but the shapes and patterns are just too much fun! That is saying a lot as I've been a Stampin' Up! Demonstrator for over 14 years now, and that means I have a LOT of snowflake sets--come on, you know that we always "need" the latest and greatest snowflake set :) I'm typing up this blog post as I look out my window and see the sunny blue skies and not a bit of snow on the ground, which is just fine with me! We got a little snow in the mountains last night, but just a bunch of rain here in the valley. Now this is my kind of winter! I'd prefer to have my snowflakes be the stamped kind and my snowmen to be the sidewalk chalk variety.

Saturday, December 1, 2012
Candy Cane Stripes
I feel like it has been forever since I participated in a blog challenge! It's probably only been a couple of weeks, but I've missed them--and my creating time. Thanksgiving and my Christmas Card Buffet took my time away, so I haven't had much time to sit down and just create, but I managed to get a little time in today. I decided to start by participating in the current sketch challenge at Freshly Made Sketches. I wanted to keep my card clean, and bold, so I limited the amount of color on it. I chose Cherry Cobbler and Very Vanilla for my colors and then started to create. I knew I wanted to mimic the stripes on the candy canes, so I turned to my trusty Patterns Designer Series Paper and used some of the Cherry Cobbler stripes for my background. I've definitely decided that the Scentsational Seasons set is my favorite Christmas set this year (as you can probably tell by the number of times I've used it thus far), so I used the candy canes from that set for my main image. I cut those out with the coordinating framelits and then layered them on a Cherry Cobbler circle that textured with the chevron embossing folder and then punched with the 2-1/2" circle punch. That is layered on a scalloped circle that was cut from the Perfect Pennants big shot die and is then mounted with some Stampin' Dimensionals so that it stands out from the card a little. The banners are all cut with the Bitty Banners framelits--funny thing is I didn't think I'd use those framelits a lot when I first got them, boy was I wrong! I stamped the greeting from Teeny Tiny Wishes and then finished of my card with a Very Vanilla seam binding ribbon bow around the candy canes.


Monday, November 26, 2012
Polka Dots for Christmas
Christmas is less than a month away! Are you getting ready? We (okay, my husband) put up the Christmas lights on Thanksgiving. My kids LOVE the Christmas lights and it is so fun to watch their excitement every time they see them, so I encouraged my husband to get them up so we could turn them on Thanksgiving night. My husband is one of those guys who doesn't like Christmas music or Christmas lights on before Thanksgiving, so we settled for the first day he'd turn them on. It's fun to take little drives around the neighborhood and listen to the kids' excitement over even the simplest light displays.
Tomorrow and Wednesday I am holding my annual Christmas Card Buffet where we'll be making a bunch of Christmas cards. My intention is to have this class at the end of October each year, but this year the last month has really gotten away from me. Oh well, at least it is happening before December! This is one of the cards that people have the option of making. I made one similar to this a few months ago, but I had to modify it so that I had the right supplies for the class. I used the Scentsational Season stamp set for the tree and star and the Embellished Events set for the greeting. Colors are Gumball Green, Raspberry Ripple, and Daffodil Delight. I textured the background with (my favorite) Perfect Polka Dots embossing folder to mimic the dots in the Christmas tree. I also added some polka dot paper (another favorite) from the In Color Patterns DSP Stack and mounted that on some white that I punched the scallop trim border punch along. I finished things off with the Raspberry Ripple stitched satin ribbon around the pattern paper. Happy 26th of November!!!
Friday, November 16, 2012
Swirled Snowflakes
A couple weeks ago my friend Pam asked if I had the Snow Swirled stamp set. She borrowed it and made a card similar to this. I loved how she used red and green and gray together, so I used some elements of the card (the snowflake background, the greeting, and the diagonal ribbon) and changed up the rest a bit to create my own. I changed the red to Cherry Cobbler, the olive to Garden Green and left the Basic Gray. I also loved how she used ribbon on the card and just glued a piece diagonally--I did this with the Cherry Cobbler seam binding ribbon. The verse also comes from the Snow Swirled stamp set and is punched with the wide oval punch and layered on the Decorative Label Punch. I wanted it to stand out a little, so I added the blossom punch behind it. I figured it has 6 sides like a snowflake, so why not?
This week's challenge on Hand Stamped Sentiments is to make a card with Snowflakes, so here it is. Hope you enjoy!
Labels:
christmas cards,
Snow Swirled,
theme challenge
Thursday, November 15, 2012
Candy Cane Duo
I consider myself a "brights" girl when it comes to selecting colors to stamp with (Stampin' Up! has 4 color collections: brights, regals, subtles, and neutrals). Most of the year the brights are my go to group of colors, they just make me happy. Now that it is Fall and Christmas is coming, I am loving all of the color combos lately, and find that the regals mixed with neutrals are some of my new favorites. My card here was made with Sahara Sand and Cherry Cobbler, the current combo of colors at Dynamic Duos. I also combined those colors with the layout at Mojo Monday.
I textured my background with the Chevron embossing folder and then added a strip of paper from the Be of Good Cheer DSP pack. I stamped the candy canes from the Scentsational Seasons stamp set and cut them with the coordinating framelits. My greeting comes from Teeny Tiny Wishes and is stamped on crumb cake card stock then layered on cherry cobbler that I punched with the scallop edge punch before layering it on some white card stock (so that the cherry layer would stand out from the dsp paper). I tied those layers together with some Cherry Cobbler seam binding ribbon and added them to my card base. Thanks to the fun blogs for the color and layout inspiration! 35 days until Christmas!


Wednesday, November 14, 2012
Gift Stack
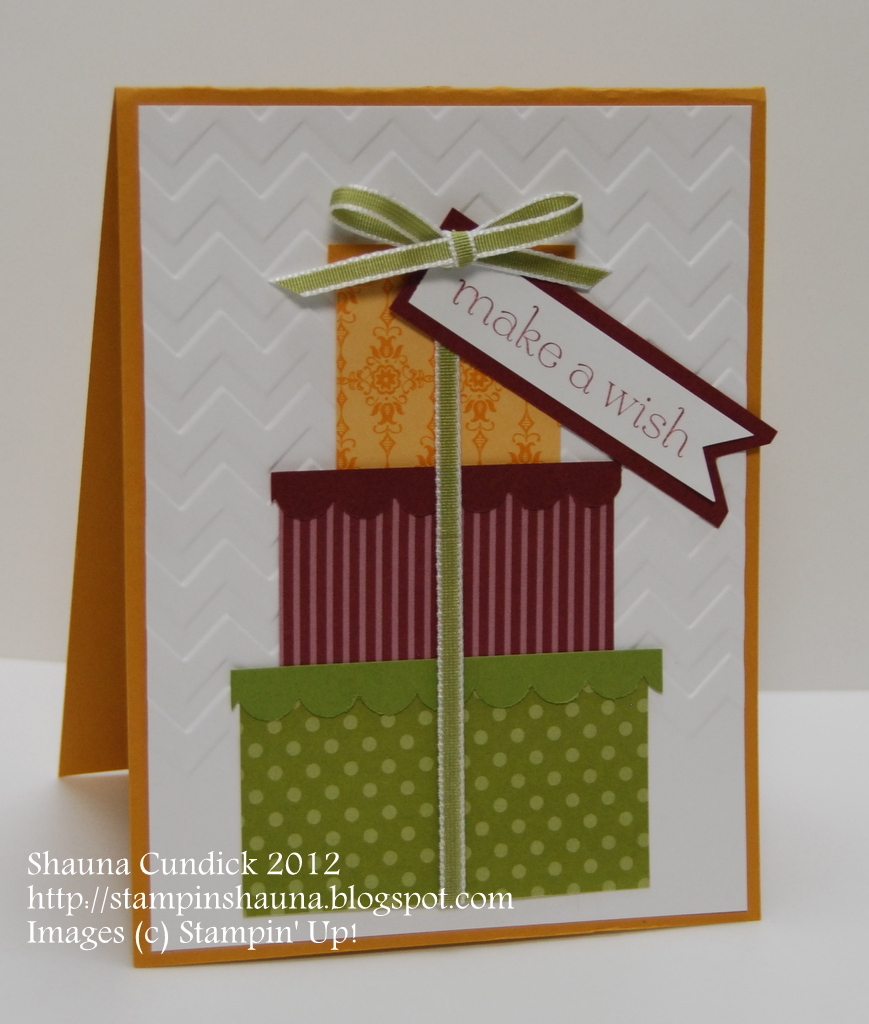
It's so fun to be able to share ideas with each other online. I saw an idea that inspired this card online, but it wasn't credited, so whoever made a card like this for a swap, thank you for the inspiration! I took the idea she used of the stacked gifts and switched it up a bit. I decided to make my card be a birthday card, so I chose some fun papers from the Patterns DSP stacks in the colors to go with The Paper Players challenge this week--Old Olive, More Mustard, and Bravo Burgundy. I cut my designer series paper into rectangles and then made "lids" for each of the gifts by punching strips of the matching card stock with the scallop edge punch (I sized the strips just a tad longer than the gifts). I wanted to keep my background clean and simple so that the gifts would really stand out, so I used white for a background color. It needed some texture in the background to go along with all of the fun patterns, so I textured it with the Chevron embossing folder before mounting it on my More Mustard card base. I used some Old Olive 1/8" Taffeta Ribbon to "tie" my gift stack together and then made a tag with card stock and the Sweet Essentials stamp set. The bow is actually a separate piece of ribbon that I tied and then adhered with a mini glue dot on top of the tag. This is a fun idea that could be used for Christmas as well.
Labels:
birthday,
christmas cards,
color challenge,
sweet essentials
Monday, November 12, 2012
Rich Red Ornament
So many great challenges, so little time to stamp! I've had quite a list of sketch and color challenges that I've wanted to try out and I didn't get nearly the amount of stamping time that I hoped for this weekend. There were a few challenges that were due today, so I decided to combine a couple so that I could realistically complete them. This is the card that I came up with for the fabulous color challenge at colourQ and for the awesome sketch challenge from Freshly Made Sketches. You'd think that with the colors and layout already selected the card would be quick and easy to put together. Well, the challenges definitely inspired me, but this card took some time and a bit of trial and error. Originally I wasn't thinking Christmas when selecting the colors (Cherry Cobbler, Daffodil Delight, Crumb Cake, and Soft Suede) but then I started creating and I knew I wanted to use the Ornament Keepsakes set and the Lacy Brocade embossing folder. I love how this turned out--a rich, bold Christmas card that still uses the traditional red but really doesn't need any green. I used my matching framelits to cut the ornament and then layered it onto the Crumb Cake circle that I textured with the Perfect Polka Dots embossing folder and punched with the 2-1/2" circle punch. That is layered on a scalloped circle cut with the perfect pennants big shot die. My designer paper is from the Floral District dsp (the yellow) and the Neutrals Patterns dsp (the suede dots). I stamped the greeting from Teeny Tiny Wishes and punched it with the word window and modern label punches. I finished off the card by adding some 1/8" taffeta ribbon in Daffodil Delight to "hang" my ornament.
Hope you enjoy!

Hope you enjoy!

Thursday, November 8, 2012
Ornament Keepsakes In Color
As I've been working on Christmas cards, I've been trying to come up with color combos beyond the traditional red and green. For this card, I used the new Ornament Keepsakes stamp set along with some of the 2011-2013 In Colors. I chose Wisteria Wonder, Pool Party, and Island Indigo to echo the cooler days of Winter. After stamping my ornaments and layering them, I tied some Wisteria Wonder Ruffled Ribbon around it and then layered it onto my Wisteria Wonder card base that I textured with the Lacy Brocade embossing folder. If you haven't seen the embossing folder or ornament set yet, you can check out the Holiday Catalog and order through my website.
Labels:
christmas cards,
in colors,
ornament keepsakes
Monday, November 5, 2012
Red Snowflake Trio
When Stampin' Up!'s Holiday Catalog debuted, I didn't think I "needed" another snowflake stamp set. I have so many, most of which are retired so I can't demonstrate them anymore (but that doesn't keep me from collecting and occasionally using them for personal use). After passing by the Snowflake Soiree stamp set several times, I was placing my second order from that catalog and decided that I should indeed add it to my snowflake collection. I'm so glad I did!
I loved the colors from the Pals Paper Arts color challenge this week--Riding Hood Red, Crumb Cake, and Very Vanilla. I built this card from the ground up (meaning that I started with my card base and then my layers and then added the stamps very last. I used the striped paper from the Regals Patterns DSP stack and mounted that on Riding Hood Red card base. I textured my Crumb Cake card stock with the Chevron Textured Impressions folder and tied some Very Vanilla seam binding ribbon around it before mounting it on some Very Vanilla card stock. My snowflakes are stamped with Riding Hood Red ink onto Very Vanilla card stock and then punched with the 1-1/4" square punch, then those squares are mounted on red squares punched with the 1-3/8" square punch. In the past I've had a tendency to stamp snowflakes in more traditional snowflake colors like white or blue, but this year I've gone away from the norm and have had a lot of fun stamping them in all sorts of colors. I really like them with this color palette.

I loved the colors from the Pals Paper Arts color challenge this week--Riding Hood Red, Crumb Cake, and Very Vanilla. I built this card from the ground up (meaning that I started with my card base and then my layers and then added the stamps very last. I used the striped paper from the Regals Patterns DSP stack and mounted that on Riding Hood Red card base. I textured my Crumb Cake card stock with the Chevron Textured Impressions folder and tied some Very Vanilla seam binding ribbon around it before mounting it on some Very Vanilla card stock. My snowflakes are stamped with Riding Hood Red ink onto Very Vanilla card stock and then punched with the 1-1/4" square punch, then those squares are mounted on red squares punched with the 1-3/8" square punch. In the past I've had a tendency to stamp snowflakes in more traditional snowflake colors like white or blue, but this year I've gone away from the norm and have had a lot of fun stamping them in all sorts of colors. I really like them with this color palette.
Labels:
christmas cards,
color challenge,
snowflake soiree
Sunday, November 4, 2012
Merry Snowflake
I'm trying to get in the Christmas mode with my stamping, but it seems that I keep reverting back to Fall (which only makes sense because it IS Fall). I am needing to make a bunch of different Christmas cards so that I can plan my next stamping class, which I'm hoping will take place next week. Here is a card that I might offer at the class, what do you think?
I used the Snowflake Soiree stamp set for both the words and the snowflake. I stamped the Merry multiple times in Riding Hood Red and then just once in Garden Green to highlight it. I then mounted my stamped layer on some Riding Hood Red card stock. I stamped the large snowflake in Garden Green and then punched it out with the blossom punch--isn't that a cool use for it?! I wanted the snowflake to stand out against the busy background, so I added a garden green punched blossom behind it. I textured my card base with the petals-a-plenty textured impressions folder and then layered everything onto it. Do you recognize this layout? Check out this post.
Friday, October 19, 2012
Snowflake Panels and Polka Dots
I stumbled upon a new sketch challenge site today and had to try out the current sketch from
Unscripted Sketches. I liked the panel look of the stamped layer, it makes it so visually interesting to look at. I decided to make a winter card with the Snowflake Soiree set. My greeting comes from the Sweet Essentials set. I used the "Make a Wish" stamp and just inked the "wish"part of the stamp (although I'm not wishing for snow anytime soon). I punched it out with the designer label punch--punched the tall way. I picked three blues for my snowflakes--Baja Breeze, Marina Mist, and Midnight Muse. The Marina Mist polka dot paper is from the Polka Dot Parade DSP pack. I tied some Midnight Muse stitched satin ribbon around the card and tucked it under my punched greeting to finish it off.

Thursday, October 18, 2012
Subtle Snowflakes
Here's my card for the current challenge over at Dynamic Duos--Pool Party and Soft Suede. It sure is nice to just grab a couple ink pads and a couple packs of card stock and start creating! I wanted my card to be something a little different than I usually do so I picked this clean and simple layout. When I've been prepping for classes lately, I'm realized that I'm having to cut a bunch of layers for one card and that I need to simplify a bit. Simple is beautiful. I wanted to use a crisp and elegant set to go along with my simplicity, so I chose Stampin' Up!'s Snowflake Soiree stamp set. I stamped a small snowflake in Pool Party all over the background of half of my card. I then used the color spritzer to add speckles in the white space on that same half (after all, snow falls in various sizes so I couldn't just use the small snowflake stamp). I then inked up a larger snowflake in Soft Suede and stamped that over the top of the background I just created. On the other half of my card, I stamped the Believe stamp (also from the Snowflake Soiree set) and one more Pool Party Snowflake. To separate the two sides, I tied some Pool Party seam binding ribbon around it and layered everything to my card base.


Wednesday, October 17, 2012
Dots and Stripes Christmas
The challenge over at Just Add Ink is a theme challenge to just add something new! The Polka Dot Parade Designer Series Paper is my favorite pack of paper, it was new with the current Stampin' Up! catalog. I love the boldness of the white polka dots. I combined it with the stripes of the patterns dsp for this card. The polka dots in red mimic the polka dots on the Christmas tree from the Scentsational Season stamp set (my favorite new set in the Holiday catalog). I stamped the greeting from the Embellished Events set. This is a simple card to stamp, just two stamps punched out with the 2-1/2" circle punch. The majority of the time spent on this card is just creating the layers, which doesn't take too long either--I love quick cards! My colors are Real Red and Gumball Green (new In Color this year). The white flags are 1/2 of the larger banner from the Bitty Banners framelits (new in the current catalog). I textured the background with the polka dot embossing folder and tied some Gumball Green stitched satin ribbon around the card before adhering my stamped layer with some Stampin' Dimensionals. I love using new products and finding ways to mix them with old products for great results!
HONORABLE MENTION!
Monday, October 15, 2012
Candy Cane Splatter
I took the weekend off from blogging again, but I'm back! I wanted to hurry and share a card that I made this morning to go along with the sketch at Freshly Made Sketches. When I saw this sketch last week, I knew I wanted to try it with the Candy Cane stamp from Stampin' Up!'s Scentsational Season stamp set. I really should start using some of my other new Christmas stamps, but I just can't get enough of this set! I wanted to use the Be of Good Cheer DSP, so I chose Very Vanilla, Gumball Green, and Cherry Cobbler for my color palette. I stamped candy canes randomly on my card stock and then filled in the white space with my color spritzer tool and Gumball Green marker. I layered card stock and dsp and then tied some Gumball Green Stitched Satin Ribbon around the card before adding my greeting. I stamped the greeting from the Embellished Events set and punched it with the oval punch, scalloped oval punch, and designer label punch. What a fun sketch!
Wednesday, October 10, 2012
Christmas Cheer Cocoa
I love the images in the Scentsational Seasons stamp set (it's in the Stampin' Up! Holiday Catalog). They are such a great size and I love how bold they are--which translates into just stamping/no coloring/fast cards! This week's challenge over at The Paper Players is a Cup of Joy Theme Challenge where you make a card with a cup on it. Here's my creation. I was definitely up for the challenge because I have been giving a lot of attention to the other stamps in this set and I hadn't yet used the hot cocoa mug. I picked my favorite Christmas color combo of the year--Raspberry Ripple and Gumball Green for this card. I stamped my images from the Scentsational Seasons set and Sweet Essentials (word set). I cut my greeting into a banner shape and layered it on some Gumball Green Stitched Satin Ribbon. My card base is Gumball Green with Raspberry Ripple card stock and Patterns Designer Series Paper layered on it. It won't be long until hot cocoa will really be in season, although I hope the cold doesn't come too soon! This morning we were only in the 40s but by afternoon we had a gorgeous 75 degree day!


Friday, October 5, 2012
Cherry Candy Cane
Christmas is coming! It seems like it is far away, but I think it will be here before we know it! Here's a quick and fun Christmas card idea. I used the same colors from yesterday--Cherry Cobbler and Gumball Green. The striped paper is from the Be of Good Cheer DSP pack. I ran the strip of Cherry Cobbler card stock through the Petals-a-Plenty textured impressions embossing folder and I also ran the Cherry card stock that frames the Candy Cane through my Big Shot with the polka dot embossing folder. This card uses the Scentsational Seasons stamp set along with the Embellished Events set (for the greeting). Everything is mounted to a Very Vanilla card base and finished off with some Gumball Green Stitched Satin Ribbon.
Thursday, October 4, 2012
Texture, Patterns, and Christmas
It's been a week or so since I sat down and created a card, so it was fun to play along with the Dynamic Duos challenge this week to get myself back in the groove. This week's challenge was to use Cherry Cobbler and your choice. I decided to make a Christmas card, so I paired Cherry Cobbler with Gumball Green (with Very Vanilla as my neutral). I love the Be of Good Cheer designer series paper, so I picked a couple of patterns from that for my card. I stamped the polka dot Christmas tree from the Scentsational Seasons set and added "Merry Christmas" from Embellished Events and punched them out with the 2-1/2" circle punch. I used some Gumball Green stitched satin ribbon to "tie" my patterns together and then added some vanilla banners (cut with the Bitty Banners framelits). I mounted everything on my Cherry Cobbler card base that I textured with the perfect polka dots textured impressions folder.


Subscribe to:
Posts (Atom)