Ugh, computer issues. I've been taking a little time off of blogging, but not by choice. Does anyone have a great fix for a laptop that has screen issues? Sometimes I have to hold part of the lower corner of the screen in order for it to work, otherwise it freezes and puts lines all over the place. It's working fine today, but that's the first time in a couple of weeks that I haven't had to fight with it. I'm not wanting to replace it yet, so hopefully it will play nice! Enough of that, on to some stamping...
I made this fun, quick card a while ago for my last Stamp-a-Stack. I was inspired by a card that Julie Davidson made with the Mixed Bunch stamp set. I loved the simplicity of this card. I stamped one of the flowers from the Flower Shop stamp set and punched it with the Pansy Punch and adhered it to my card with a Stampin' Dimensional. I tied some white stitched grosgrain around the Crisp Cantaloupe card stock and glued that to my card base (white card stock with a strip of Crisp Cantaloupe Patterns DSP on it). Finally, I added my greeting from Sweet Essentials. Enjoy!
Monday, October 7, 2013
Thursday, September 12, 2013
Razzleberry Party Stars
I sure love color challenges. They give me inspiration to combine colors that I may not have thought of, and they also get me a little out of my comfort zone. Today's color challenge is brought to you by The Paper Players. The challenge colors are Rich Razzleberry, Pool Party, and Basic Black. I originally thought of using flowers with this combo, but I decided to try out stars instead.
I stamped the four stars from the Simply Stars stamp set in Rich Razzleberry and Pool Party and layered that panel onto some Pool Party and Basic Black card stock. I then tied some 1/8" taffeta ribbon around that. I stamped a strip of Rich Razzleberry with one of the larger stars for a little color on color background and then layered everything onto my Pool Party card base. I like how adding just a bit of black helps things to stand out and really pop!
Wednesday, September 11, 2013
Bold and Sassy Flowers
I love this color combination from colourq this week, it looks so bold and sassy--Primrose Petals, Daffodil Delight, Bermuda Bay, and Rich Razzleberry. I wanted to make a card with a simple layout so that the colors would really be the spotlight, so this is what I came up with.
I stamped four different flowers from the Flower Shop stamp set and then layered that stamped panel onto some Bermuda Bay card stock. I tied some 3/8" Primrose stitched satin ribbon around that and layered it onto my Daffodil Delight card base. I stamped the "thank you" from the Made for You stamp set and punched it with the the oval punch and layered that onto some Rich Razzleberry punched with the scallop oval punch. I can't wait to try out this color combo again!
Monday, September 9, 2013
In Color Patterned Star
Okay, today you get a bonus post--yep, two posts in one day! I didn't know if I'd get time to play along with another challenge that was due today, but I managed to put together a card during naptime :)
I wanted to join the theme challenge from Stampin' Royalty which was to use patterned paper. You all know how I love the Designer Series Paper Stacks, so I just couldn't pass up this challenge! I decided to use some of the new 2013-2015 In Colors, so I grabbed that stack and pulled out some Strawberry Slush, Coastal Cabana, and Crisp Cantaloupe papers. I mounted strips those onto some black to really help them pop. For my card base, I textured some white card stock with the Chevron embossing folder and mounted that onto Basic Black. The star comes from the new Simply Stars stamp set--love how versatile stars are, and the greeting banner is from the Banner Greetings Hostess set (you can get this set FREE when hosting a qualifying workshop or for placing a $150+ order). I want to give a quick shout out to the talented Jill Hilliard who's Modern Mosaic card gave me the layout inspiration for this card. I love the combo of textures and patterns, and of course the combination of my two favorite products--DSP and embossing folders!
Bold Midnight Curry Flowers
There are so many fun card challenges that I want to participate in and I just don't have the time. So, this morning I decided to combine a couple of my favorites and this is the card I came up with.
I got my layout inspiration from the sketch over at Freshly Made Sketches and combined that with some color inspiration from Pals Paper Arts. I love the bold colors together--Crushed Curry, Midnight Muse, and Early Espresso. I stamped some flowers from the Flower Shop stamp set randomly and then layered that panel onto Midnight Muse and Early Espresso card stock. I wanted to add more of the Crushed Curry color, so I textured a strip of it with the Petals-a-Plenty embossing folder and added that to the card. I didn't want to overdo the bold colors, so I used a big panel of white on top of my Midnight Muse card base, that way I could also stamp my greeting from Sweet Essentials (using Early Espresso ink) without having to add another layer for the text. To "tie" the card all together, I added some of my favorite 3/8" stitched satin ribbon in Midnight Muse. Happy Monday!
Sunday, September 8, 2013
Pacific Olive Papillon Potpourri
This morning I sat down with my daughter and we did a little stamping. It's fun to have a stamping buddy and she loved making things with butterflies. My husband asked how soon she can sign up to be a demonstrator, and I told him that she has to be 18, so we have quite a while to go :) I love watching her create and can't wait to spend more stamping time with her.
I stamped this card to go along with the color challenge at Dynamic Duos this week. The duo is Old Olive and Pacific Point. I started with a white card base and added some Olive Patterns DSP for the background. I stamped some Pacific Point butterflies and punched them out with the Elegant Butterfly punch before layering them on my 1-1/4" and 1-3/8" squares. I popped them up a bit with some Stampin' Dimensionals. I layered the squares onto some Pacific Point card stock and added some white 1/4" stitched grosgrain and layered that onto my card. The "thinking of you" comes from the Sweet Essentials stamp set and is cut into a pennant shape with the help of my trusty Hexagon punch (punched on the sides). I couldn't decide whether I should put the greeting above or below my butterflies, so my little helper decided for me. I think she made a good choice! It's nice to have someone to bounce ideas off of :)
Wednesday, September 4, 2013
Cajun Gently Falling
I can't believe that Summer is over (well, in the Summer Vacation sense, not the calendar dates). School is back in and the outdoor pools have closed, but it sure doesn't feel like Fall yet. We've had a break from the 100s and are in the 90s now, but it is still plenty hot! I'm doubting that we'll break the record for 100+ degree days now, but I guess that could still happen. I think we've got one more day to tie the record set in 1994 and two days to break it. All I can say is that it is HOT (but I'm not looking forward to snow). Let's just hope for months of 70s and 80s, doesn't that sound nice? Now, enough about the weather!
I stamped this Fall card since it's time to give into the fact that school is back in and our lazy Summer days are a thing of the past. It goes along with this week's theme challenge over at The Paper Players, which is to make a Fall-themed card. I stamped my white panel with the Gently Falling stamp set and used Cherry Cobbler, Cajun Craze, Old Olive, and Night of Navy. That panel is mounted on some Old Olive card stock and then tied with some 1/4" stitched grosgrain ribbon (wish that stuff came in even more colors), and then mounted onto my Cajun Craze card base. It's a pretty simple card to put together. Enjoy!
Saturday, August 24, 2013
Summer Bright Stars
A friend of mine asked me to do a class for her this fall, so I've been stamping up a few cards. I'm not sure how experienced the stampers are going to be, so I'm trying to keep things simple, but fun. Here's one of the cards that we'll be making at the class.
I decided to keep the supplies simple for this card, so I picked one of my old favorite layouts. I stamped all four of the stars from the new Simply Stars stamp set in both Daffodil Delight and Bermuda Bay (love the bold combo these two make)! I'm so glad that Bermuda Bay returned this year and is now part of our main color families! I mounted that stamped strip onto some Bermuda Bay card stock and tied a bit of Daffodil striped grosgrain ribbon around it before mounting it onto my Daffodil Delight card base. I stamped the "thinking of you" from the Sweet Essentials stamp set in Bermuda Bay to finish off the card. Simple, yet striking! You could even leave off the ribbon (or leave it on) and this card would work for a man too.
Friday, August 23, 2013
Sassy Strawberry Thanks
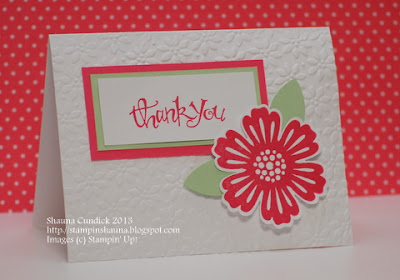
Have you checked out the 2013-2015 In Colors yet? I love the Strawberry Slush color (shown here on both the backdrop paper and on the card). I paired it with another of the new In Colors--Pistachio Pudding. I wanted to keep this card clean and fresh, so I used a lot of white along with my In Colors.
I textured the card base with the Petals-a-Plenty embossing folder, those embossing folders add a lot to cards with minimal effort. They are my favorite product for the Big Shot (and I love that they are only $7.95)! I stamped a flower from the Mixed Bunch set and punched it with the coordinating blossom punch and raised it up a bit with some Stampin' Dimensionals. The "thank you" comes from my favorite greeting set--Sassy Salutations. This reminds me that I need to go write a couple of thank you cards. Hope you enjoy!
Labels:
big shot,
in colors,
mixed bunch,
sassy salutations
Wednesday, August 21, 2013
Chevron Birthday Duo
Here we go. It's been too long (again) since I've posted a card. I have more cards to share and just need to get them uploaded. This week's duo over at the Dynamic Duos challenge combines Pool Party with Basic Black with the option of embossing. I just couldn't resist playing along--I love embossing and the color combo was striking!
I was able to combine a few of my favorite products--the black chevron ribbon, the single Birthday Cake stamp, and the chevron embossing folder. I stamped the "happy birthday" from Teeny Tiny Wishes and then punched it with the Word Window punch and the Modern Label punch. This is a pretty quick and simple card to make, but the combination of colors, patterns, and texture really set it apart!
Friday, July 5, 2013
Sherbet Flavored Flowers
Don't these colors remind you of some nice cold sherbet? That sounds pretty tasty to me right now! I chose these colors for the card thanks to the challenge over at Hand Stamped Sentiments--Daffodil Delight, Crisp Cantaloupe, Pistachio Pudding, and Strawberry Slush. All but the Daffodil Delight are new In Colors for 2013-2015 and I just love them! I paired the color challenge with this week's sketch from Freshly Made Sketches. Thanks for the great inspiration!
I stamped the flowers from the new Flower Shop stamp set and punched an additional flower out with the coordinating pansy punch (then raised it a bit with a Stampin' Dimensional). I added some Pistachio leaves that I cut with the Secret Garden Framelit to the raised flower. If you've followed my blog for any length of time, you probably know that I add some Patterns Designer Series Paper or some texture from an embossing folder to almost every card--well, here I did both! Designer Series Paper and Textured Impressions are my favorite accessories (and I love ribbon as well) so I added them all to this card to go along with the SUO Challenge. I used some of the new In Color (Strawberry Slush) Patterns DSP in the polka dot pattern along with the polka dot embossing folder to create my background. I separated the two with some Daffodil Seam Binding ribbon. Hope you enjoy!
Labels:
color challenge,
flower shop,
in colors,
sketch challenge
Thursday, July 4, 2013
Patriotic Congrats
Happy 4th of July! I decided that today was a great day to use my Simply Stars set with a patriotic theme. I used the colors from the Pals Paper Arts challenge--Real Red, Pacific Point, and Crumb Cake. I punched the stars out with the retired small and large star punches from Stampin' Up! The background is textured with the stripes embossing folder (you can't have stars without stripes on Independence Day). I stamped the congrats stamp from the Sweet Essentials set. I hope you all enjoy the holiday!
Labels:
color challenge,
simply stars,
sweet essentials
Wednesday, July 3, 2013
Yellow Chevron Birthday
It's summer and it definitely feels like it! We've had a 100-105 degree heat wave over the past week and something a little cooler sounds nice. Summer means heat but it also means bright, so I chose to make a bright birthday card today! I used the Tic Tac Toe Challenge over at The Paper Players for my card inspiration--my three in a row were yellow, birthday, and ribbon.
Chevrons seem to be pretty popular lately, so there is no shortage of chevron stamps and accessories. I started this card with the single Birthday Cake stamp which has a chevron pattern on it. I mimicked that pattern with my Daffodil Delight card base textured with the Chevron embossing folder. I added my final chevrons with the new chevron ribbon in black. The "happy birthday" comes from the Remembering Your Birthday set and I gave it the flag/pennant ends by punching the ends with the hexagon punch.
Thursday, June 27, 2013
Polka Dot Mosaic Flower
Have you checked out the new Mosaic Madness stamp set yet (along with the coordinating punch)? I've seen a lot of fun ideas with this set and I love how it can be used for all occasions. My favorite idea was one posted by a fellow demonstrator, Julie Davidson. She used the set to make a flower, so I had to try it out for myself!
I stamped some of the mosaic shapes in Strawberry Slush (for the petals) and Gumball Green (for the leaves). I used one of the small elements for the center of the flower and punched it with the 3/4" circle punch. I mounted all of my petals and leaves on a piece of Strawberry Slush polka dot paper from the In Color Patterns DSP Stack. I layered that on some white and Daffodil Delight and finally onto my Gumball Green card base (textured with the perfect polka dots embossing folder. I stamped the greeting from Sassy Salutations (on sale for 25% off through the end of this month) in Strawberry Slush and then cut the ends of it into a banner shape with the hexagon punch. Hope you enjoy!
Wednesday, June 26, 2013
Hot Hot Hexagons
Doesn't this color combo just scream HOT to you? It's supposed to be over 100 degrees here the next few days, so it is a perfect color combo for how it feels! Good timing for this week's Dynamic Duos Challenge--Tangerine Tango and Cajun Craze. I've had a bunch of blog challenge tabs open on my computer for the last few weeks with the intention to get downstairs and try them out with my stamps. Unfortunately, I find myself clicking through the tabs and closing them once the links close, meaning no stamping time. However, I escaped for a few minutes today and doubled my stamping productivity for the month (pretty sad, that means I made 2 cards for a total of 4 so far this month). I sure hope I can get the ball rolling and stamp more often! Why do these "lazy days of summer" just fly by and seem anything but lazy?!
I chose the Six Sided Sampler set for this card. Orange is my little guy's favorite color, so I decided that this needed to be a non-girly card. I looked at my stack of new sets and this set won the decision! I love having sets that coordinate with punches--and even better this one also coordinates with the textured impressions embossing folder! I started with my Cajun card base and added a layer of white and then Tangerine (textured with the embossing folder). I also added a strip of Cajun mounted on White for a vertical element on the card. I stamped my hexagons in Cajun Craze and Tangerine Tango, punched them and added them to the top and finally added my greeting (also in the Six Sided Sampler set). Do you know how I made that a pennant shape? I had a strip of white and used the hexagon punch to cut the end for the flag shape. Have you ordered your new stamps yet?
Labels:
big shot,
color challenge,
six sided sampler
Tuesday, June 11, 2013
Summer Flower Shop
Have you checked out the Flower Shop stamp set yet (and the coordinating Pansy Punch)? This was the first set on my "need" list from the new catalog. I love coordinating stamps and punches, and each year I pick out a new favorite flower stamp set. 15 years as a demonstrator means a lot of favorite flower sets! School is out and Summer weather is officially here (10-15 degrees above normal) so stamping with bright summery colors was in order!
I stamped three of the flowers from the Flower Shop set in Strawberry Slush (one of the new In Colors), Tangerine Tango, and Daffodil Delight. I mounted that on some Strawberry Slush card stock and added a strip of the new Patterns DSP in Strawberry Slush along the bottom. To separate the stamped paper and the designer series paper, I tied some daffodil stitched grosgrain ribbon. I layered the panel onto just a bit of white card stock to help divide the Strawberry Slush card stock from the Daffodil Delight card base. I'm in love with the textured embossing folders, so I textured the card base with the perfect polka dot embossing folder to really finish off the card. Hope you are enjoying your summer days!
Monday, June 10, 2013
Clean Pansies
Have you noticed the Grab Your Greetings promotion that Stampin' Up! is having right now? There are 3 great greeting sets available at a 25% discount right now, including my FAVORITE word set: Sassy Salutations! I decided that a card using that set was in order, and of course I had to pair that with new product :)
I wanted to keep this card clean and simple and I love the results! I stamped the Thinking of You stamp in the new Strawberry Slush ink and then layered it on some Daffodil Delight and Strawberry Slush cardstock. I tied a bit of Daffodil Seam Binding ribbon around that panel and then mounted it on my card base (white card stock textured with the Chevron embossing folder. I added more stamping with the new Flower Shop stamp set and the new Pansy punch (available together this year in a 15% off bundle). Hope you enjoy!
Labels:
big shot,
clean and simple,
flower shop,
in colors
Thursday, June 6, 2013
Strawberry Stars
What happened to May? Sorry to all of my readers, but life just caught up with me and my blog had to be set aside for a while. I'm back, and hopefully will be posting a lot more often. The new Stampin' Up! Catalog is here and that means NEW PRODUCTS! The UPS man made my day yesterday and brought me two boxes from Stampin' Up! Now let's just hope that the kiddos will give me some time so I can start creating with my new goodies!
This card uses several new products. Two stamp sets--Simply Stars and Label Love, a new punch--the Artisan Label punch, and a fabulous new In Color--Strawberry Slush! I added a bit of white organza ribbon and popped the label up with a Stampin' Dimensional. This is a simple monochromatic card to put together. I really liked how the pattern on the stars matched the pattern on the label. Hope you enjoy! Keep checking back for more new projects!
Friday, April 26, 2013
CAS Baby Label Card
I have a feeling that this new Label Love set is going to get a lot of use! I love the fact that there is a matching punch (the Artisan Label punch) to go along with the set. There are also other punches that fit the greetings on the stamps. This particular stamp also coordinates with the new 7/8" scallop circle punch, which makes it super easy to have a two toned stamped image without a lot of work!
I wanted this card to have a clean and simple feel, so I used a white card base and kept my lines clean and straight. I stamped my label image in the NEW Smoky Slate ink as well as in Marina Mist. I kept the Smoky Slate image as my base and punched the greeting out of the Marina Mist image and layered it on the base with a Stampin' Dimensional. I mounted the stamped image on some Marina Mist, Whisper White, and Smoky Slate card stock. I cut a 1-1/2" wide strip of Marina Mist polka dot paper from the Polka Dot Parade DSP and layered that on some Smoky Slate card stock. Finally, I stamped the "congratulations" from Sweet Essentials in Marina Mist to finish the card. Keep checking back for more sneak peeks!
Labels:
clean and simple,
label love,
sweet essentials
Subscribe to:
Posts (Atom)